


How to Use an Enameled Cast Iron Dutch Oven
Few kitchen tools combine beauty, functionality, and longevity quite like an enameled cast iron Dutch oven. This timeless piece of cookware deserves a place on your stove and your table.
Unlike traditional bare cast iron, the enameled version offers the same exceptional heat retention and even cooking, but with one major advantage: no seasoning required. The smooth porcelain coating not only prevents rust but also allows you to cook acidic dishes, such as tomato-based stews, without worry. You can also sear, simmer, roast, braise, bake, and serve all in the same pot. From sourdough bread to beef bourguignon, the enameled Dutch oven does it all with style and substance.
In this guide, we’ll walk you through exactly how to use an enameled cast-iron Dutch oven, so you can get the most out of this powerhouse piece of cookware.
What Is an Enameled Cast Iron Dutch Oven
An enameled cast iron Dutch oven is a heavy-duty cooking pot made from cast iron that’s coated in a layer of smooth, nonporous enamel glaze. It retains all the strengths of traditional cast iron while eliminating the need for seasoning and reducing the risk of rust.

The enamel coating provides a non-reactive surface, that's why you can cook acidic foods like tomato sauces, wine reductions, or citrus-based braises without damaging the pot or altering the flavor. This feature alone makes it an incredibly practical choice for modern home cooks.
Most enameled Dutch ovens come with thick walls, a heavy, tight-fitting lid, and ergonomic handles for easy transfer from stovetop to oven. Available in a wide range of vibrant colors and finishes, they double as serving dishes that bring elegance from kitchen to table.
Compared to bare cast iron, enameled Dutch ovens are easier to clean, more forgiving with delicate ingredients, and better suited for those who want the performance of cast iron without maintenance.
How to Use an Enameled Cast Iron Dutch Oven

1. Preheat Gently and Evenly
Unlike thinner cookware, Dutch ovens need time to heat up. Start on low to medium heat and give it a few minutes to warm before adding oil or ingredients. Avoid blasting it with high heat from the start; the enamel is strong, but it doesn’t tolerate thermal shock well. Rapid or uneven heating can lead to discoloration, food sticking, or even cracking of the enamel over time.
2. Use the Right Oils and Fats
Once the Dutch oven is warm, add your oil or butter and allow it to come up to temperature before sautéing or searing. Avoid cooking sprays or aerosol oils as these can leave a sticky residue that’s hard to remove. Opt for oils with higher smoke points like avocado, canola, or grapeseed when searing proteins. Save the fancy olive oil for drizzling at the end.
3. Master Core Cooking Techniques
-
- Braising
Sear meat first on all sides to build flavor. Then, deglaze with liquid (broth, wine, stock), lower the heat, cover with the lid, and let the oven do the work. The tight-fitting lid traps steam, ensuring moist, tender results.
-
- Simmering
Perfect for soups, stews, and chili. Once your liquid is boiling, reduce the heat and cover to let it simmer slowly and evenly.
-
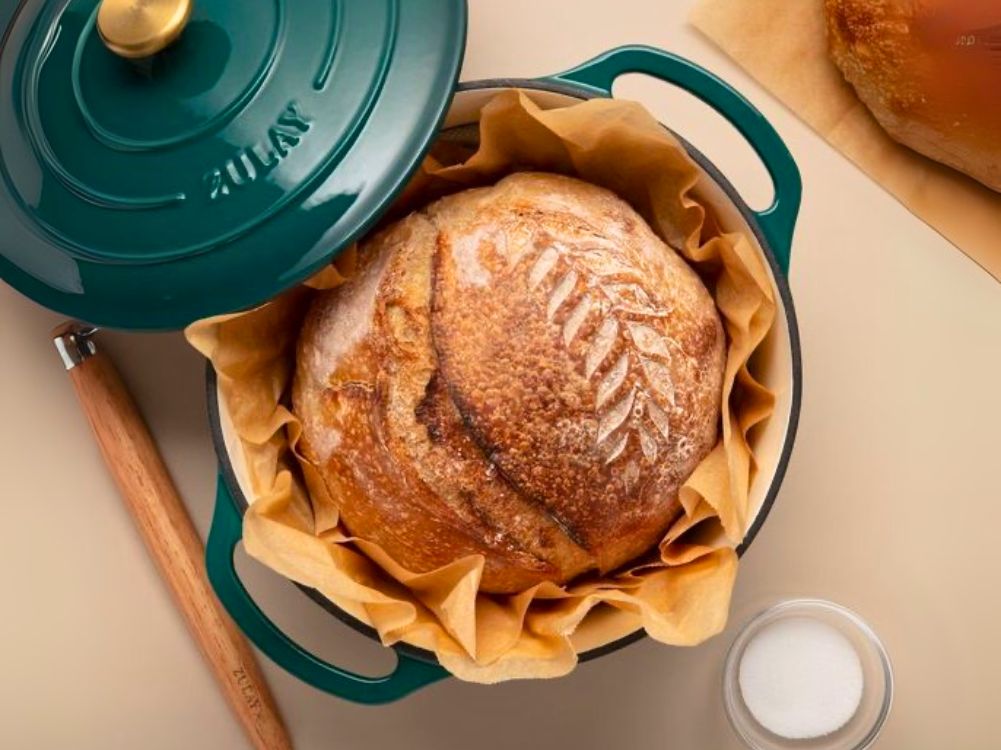
- Baking
Dutch ovens are famous for baking artisan-style bread. The heavy lid traps steam, creating a crisp, golden crust that rivals any professional bakery.
-
- Frying
The wide base and steady heat make this great for frying. Just keep your thermometer handy and avoid filling it more than halfway with oil. Just line your counter with paper towels ahead of time and it’s about to get deliciously messy.
4. Transitioning from Stovetop to Oven
One of the greatest advantages of a Dutch oven is its ability to go from stovetop to oven seamlessly. But remember, always use oven mitts since enameled cast iron retains heat extremely well and can remain hot for longer than expected. When moving the pot, lift it instead of dragging it to protect both your cookware and stovetop.

5. Serving and Cooling
With its design, your Dutch oven can go straight from oven to table as well. If you don’t want to set a blazing-hot Dutch oven directly on your counter or dinner table, a trivet or heatproof mat protects surfaces and gives your pot a secure landing zone. After serving, let it cool down completely before washing. Going from hot to cold too fast can cause the enamel to crack, and that’s a tough break.
What You Shouldn’t Do with Enameled Cast Iron

Don’t Use Metal Utensils
Yes, technically you can, but it’s a gamble. Metal tools can leave scratches on the enamel, especially if you’re stirring aggressively or scraping the bottom. Stick with teak wooden utensils, silicone spatulas, or nylon ladles. Your pot will thank you later.
Don’t Shock It with Cold Water
Just finished cooking? Great. But don’t rush to rinse it out while it’s still piping hot. Pouring cold water into a blazing-hot Dutch oven can lead to thermal shock basically, the enamel contracts too quickly and can crack. That’s not something you want to see after a long, slow-cooked masterpiece. Let it cool on its own before you wash it.
Don’t Use It in the Microwave
This one might seem obvious, but it’s worth repeating: cast iron and microwaves do not work well. The metal will spark, and you’ll have a dangerous mess on your hands. Keep this beauty on the stove or in the oven where it belongs.
Don’t Drop It
It might feel indestructible, but if you drop a Dutch oven or bang it hard against the sink, it can chip or crack. The enamel isn’t bulletproof. And since it’s heavy, dropping it could do a number on your floor or your toes, too. Treat it like the prized piece it is.
How to Clean and Store Your Enameled Dutch Oven

Hand Wash Is Best
Even if your Dutch oven claims to be dishwasher-safe, hand washing is the safer bet. The dishwasher’s high heat and harsh detergent can dull that glossy enamel over time. A simple soak in warm, soapy water and a gentle scrub with a soft sponge will do the trick.
If you have a stuck-on mess, don’t reach for steel wool. Instead, let it soak for 15–20 minutes, then use a soft nylon brush or a wooden scraper to lift off anything stubborn.
Use Baking Soda for Stains
If you’ve got a light-colored interior, it might pick up some discoloration after a few hearty meals. But all you have to do is sprinkle some baking soda and a few drops of water to form a paste, let it sit for a bit, then scrub gently. It’s a low-effort, non-toxic fix that actually works.
Dry Thoroughly Before Storing
After washing, make sure it’s completely dry before you put it away. That includes the lid and the rim, especially where moisture likes to hide. A little trapped water can lead to mold or musty smells over time. So, if you’re storing it with the lid on, slip a folded paper towel between the lid and the pot. It keeps air flowing and helps prevent any sneaky moisture buildup.
Store It Somewhere It Won’t Get Knocked Around
These pots are heavy and if you’ve ever chipped one on a cabinet door or clanged it against another pan, you know the heartbreak. Store it low and sturdy, where you don’t have to wrestle it off a high shelf. If you stack cookware, consider lining the inside with a towel to protect the enamel.
Best Recipes to Make in Your Dutch Oven
Here are some all-time favorite recipes that your enameled Dutch oven was practically made for:
-
- No-Knead Crusty Bread: If you’ve never baked bread in a Dutch oven, prepare to be amazed. This is the beginner-friendly way to get that golden, crackly crust, and airy crumb without needing a baking stone or steam oven. All it takes is a simple dough, a preheated pot, and a little patience.
- Classic Beef Bourguignon: Rich, savory, and deeply comforting. This slow-braised French stew is where your Dutch oven gets to flex its heat-holding muscles. Start by browning the beef, then build up layers of flavor with wine, herbs, and veggies. Let it simmer low and slow until the meat practically falls apart.
- Chicken and Dumplings: A true comfort food favorite. The Dutch oven’s deep sides make it perfect for bubbling broth, tender chicken, and pillowy dumplings. Bonus: it goes straight from stove to table and keeps everything warm while you serve.
- One-Pot Pasta Night: Who says you need a dozen dishes to pull off a weeknight dinner? Toss pasta, sauce, broth, veggies, and protein into the pot, cover, and let it all cook down into a perfectly saucy, hearty meal. Fewer dishes, more flavor.
- Spicy Chili or Hearty Stew: This pot is built for bold flavors and long simmers. Whether you’re making smoky chili with chipotle and beef or a vegetarian stew with beans and squash, your Dutch oven will lock in flavor and hold the perfect low simmer.

Want to take these dishes to the next level? Explore our Ingredients Collection for premium essentials that elevate flavor, and stock up on must-have kitchen tools from Zulay Kitchen. Looking for more inspiration? Check out even more ideas in our Dutch Oven Recipe Book- your next favorite meal might just be a page away!
What Enameled Dutch Oven to Use
If you're in the market for a trusty enameled Dutch oven that performs well and looks great on your countertop, the Zulay Kitchen Enameled Cast Iron Dutch Oven is a standout pick.

It is a smart choice for home cooks who want high performance without the high price tag. Its 6-quart size is just right, which is big enough for soups, braises, and even fresh-baked bread, but still manageable to lift and store. Built from durable cast iron, it delivers even heat distribution and long-lasting heat retention, while the lid’s condensation ridges help keep moisture locked in.
The vibrant enamel finish resists chips and cracks, and its sturdy handles and stainless steel knob make it easy to maneuver, even with oven mitts. It’s oven-safe up to 500°F, meaning you can bake, roast, or braise without worry, and the smooth enamel interior cleans up with just warm soapy water. Best of all, it’s a budget-friendly pick that still holds its own in expert roundups.
Why the Dutch Oven Deserves a Spot in Your Kitchen
From bubbling stews to fresh-baked bread, an enameled cast iron Dutch oven is one of the most versatile, durable, and beautiful pieces of cookware you can own. It handles high-heat searing, low-and-slow braising, and everything in between even when you’re cooking for two or feeding a crowd.
And unlike other specialty cookware that gets tucked away, this is a pot you’ll reach for again and again. The best part? With just a little care, it’ll last for decades and look good doing it.

FAQs About Enameled Cast Iron Dutch Ovens
Do I need to season an enameled cast iron Dutch oven?
No seasoning is required here. The enamel coating creates a naturally nonstick surface (with proper oil use) and protects the iron from moisture and acid. Unlike bare cast iron, there’s no need to oil and bake it before use.
Can you put enameled cast iron in the dishwasher?
Technically, yes. But it’s not ideal. Frequent dishwashing can dull the enamel finish over time, especially with harsh detergents and high heat. For best results, hand wash with warm soapy water and a soft sponge. It only takes a minute and will keep your Dutch oven looking brand new.
How do you cook with enameled cast iron?
Treat it like your go-to workhorse. Start with low to medium heat, add oil once preheated, and cook just about anything, from stews to bread. It’s perfect for recipes that start on the stove and finish in the oven. The key is even heating and patience. It’s not a fast-and-furious pan, it’s a slow-cook champion.
What’s the difference between enameled cast iron and regular cast iron?
Regular cast iron needs seasoning and can rust if not dried properly. Enameled cast iron is coated in porcelain enamel, so it doesn’t need seasoning and won’t react with acidic foods. It's lower-maintenance and a little more forgiving.
Can I bake with it, or is it just for stovetop cooking?
You can absolutely bake with it. Dutch ovens are a favorite for crusty no-knead bread, cobblers, and even small roasts. The heavy lid traps steam and heat, creating bakery-quality results right in your kitchen. Just make sure the lid knob is oven-safe (the Zulay Kitchen Dutch Oven is good up to 500°F).
Can you use an enameled Dutch oven on an induction cooktop?
Absolutely. Cast iron is naturally induction-compatible, and the enamel coating doesn’t change that. Whether you're using gas, electric, ceramic, or induction, enameled Dutch ovens work across all cooktops. Just make sure to lift it when moving since dragging can scratch your stovetop and the bottom of the pot.
Why is food sticking to my Dutch oven?
If food is sticking, chances are you're either using too high heat, not preheating properly, or not using enough oil. Enameled Dutch ovens aren’t Teflon-slick, but with the right heat control and oil, they perform beautifully. Give it a minute or two to preheat on medium, add your fat, and let the food form a crust before turning it.
Can I clean it with baking soda or vinegar?
Yes to baking soda but no to straight vinegar. A paste of baking soda and warm water is great for lifting stains or stuck-on bits without scratching the enamel. Vinegar is fine in small amounts during cooking, but soaking your Dutch oven in undiluted vinegar can dull the enamel over time.
How long will an enameled Dutch oven last?
With proper care, an enameled Dutch oven can easily last decades- many are passed down through generations. Avoid sudden temperature changes, don’t use metal tools, and hand wash when possible.

Leave a comment
This site is protected by hCaptcha and the hCaptcha Privacy Policy and Terms of Service apply.